How to Correctly Use a Tire Puncture Repair Kit

Today at Motor Guide, we are discussing a highly essential tool that every driver and vehicle enthusiast should always keep in their vehicle—a tool that acts as a massive lifesaver during an emergency. That is how to properly use a tire puncture repair kit, also known as a tubeless tire puncture kit. Since almost every vehicle on the road today uses tubeless tires, knowing how to fix a puncture yourself in just a few minutes using one of these kits is a skill every driver must absolutely learn. It gives you a great opportunity to save both your valuable time and money.
Preparing for an Emergency
First, let's see how to prepare for such an emergency. If you are driving and suddenly feel the tire losing air or realize you have a puncture, do not panic and slam on the brakes. The primary and most important step is to carefully control the vehicle, pull over to the side of the road, and stop in a flat, safe location. After that, firmly engage the handbrake, shift the gear to Park (or Neutral for manual vehicles), and make sure to turn on your hazard lights so that other vehicles can see you from a distance. When working on the side of the road, safety is more important than anything else.
Locating the Puncture
The next vital step is pinpointing exactly where the puncture is located on the tire. You need to visually inspect the entire surface of the tire by moving the vehicle slightly forward or backward. Most of the time, you will spot a nail, a piece of wire, or a small glass shard lodged in the rubber. If it is not clearly visible, you can listen closely for the hissing sound of escaping air. Alternatively, if you mix a little soap powder with water and pour or spray that soapy water all over the tire, bubbles will start forming right at the spot where the air is leaking. This method helps you confirm the exact location of the puncture with 100% accuracy.
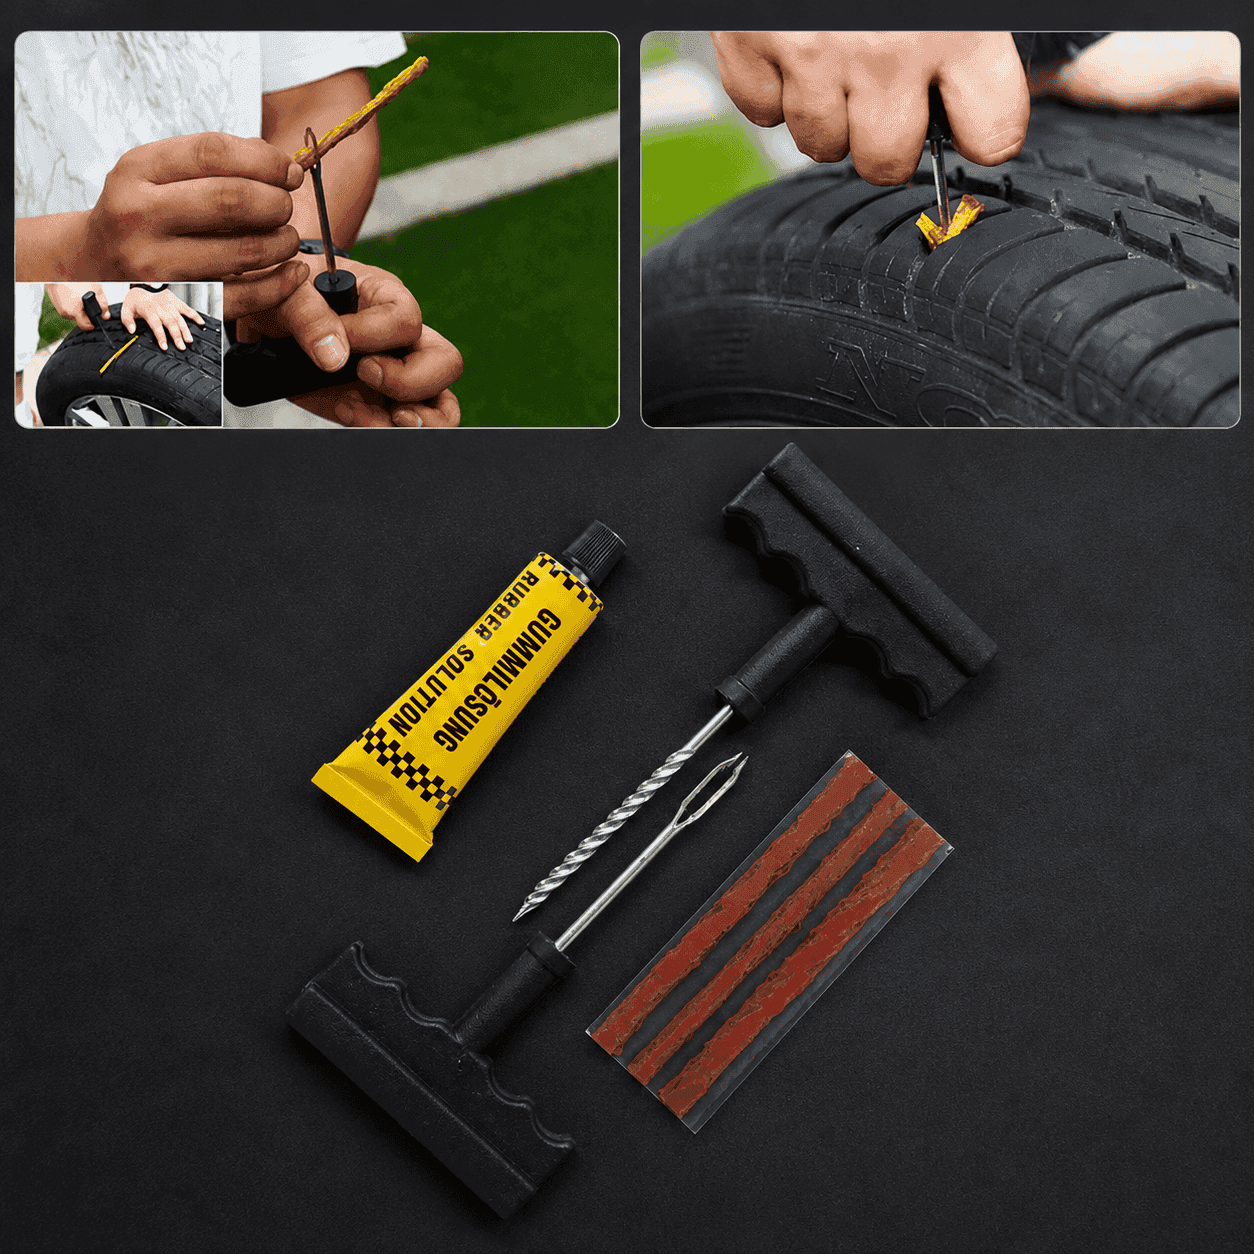
Understanding Your Repair Kit Tools
Now let's look at what tools are included in this puncture kit and how they function. You will predominantly find two T-shaped tools in the kit. The first one is the Reamer. It has a rough, spiral-shaped shaft, and its job is to clean and prepare the hole in the tire. The second tool is the Inserter (or Plugger). Its tip has a split eyelet in the middle, much like the eye of a needle. This is where the puncture strip (plug) is threaded. In addition, the kit contains sticky rubber strips (plugs) and a small tube of rubber cement (glue).
Step-by-Step Repair Process
When you start the practical work, first use a pair of pliers to carefully pull the lodged nail or wire straight out. The moment you pull it out, air will rapidly start escaping from the hole. At that precise moment, without delay, take the T-shaped Reamer tool and push it directly into the hole.
As professionals in this field, one thing we constantly notice is that many people are hesitant to clean the hole with the reamer, fearing it will make the hole too big. However, inserting the reamer and aggressively pushing it up and down while twisting it several times is absolutely mandatory to thoroughly clean the hole and roughen the inner walls. Only then will the puncture strip slide in smoothly and bond securely with the tire's rubber layers.
Inserting the Puncture Plug
Next, we need to prepare the puncture strip. Carefully peel off one sticky rubber strip from the plastic backing, thread it through the eyelet at the tip of the inserter tool, and pull it until it sits exactly in the middle with equal lengths on both sides. Think of it exactly like threading a needle. Then, apply a little rubber cement from the kit all over the strip and a bit around the reamed hole. This glue helps seal the puncture even better and acts as a lubricant so the strip slides in easily.
Now, swiftly pull the reamer tool out of the tire, and immediately push the inserter tool containing the puncture strip into the hole. You must push it in until only a small amount of the strip—about an inch—is left sticking out of the tire. Do not push the entire strip inside. The most crucial part here is to pull the tool straight out in one swift motion without twisting it. By doing so, the strip slips out of the forked eyelet and remains securely lodged inside the hole, while only the tool comes out.
Testing and Reinflating
Now, use a small blade or a pair of scissors to carefully trim the excess part of the puncture strip protruding from the tire. It is sufficient to cut it flush with the tire's surface tread. Do not dig into the tire to cut it. Afterward, apply a little soapy water to the repaired spot once again to confirm that there are no air leaks whatsoever. If no bubbles appear, your repair is 100% successful. Finally, use a small portable air compressor in your vehicle to reinflate the tire to the recommended pressure.
Motor Guide's Final Advice
Our advice at Motor Guide is to remember first and foremost that a tire puncture repair kit is only a temporary emergency solution. While punctures located on the flat tread surface of the tire can be successfully repaired this way, holes on the sidewall of the tire absolutely cannot and should not be fixed using this method. If you get a sidewall puncture, you must replace it with the spare wheel or seek a professional replacement.
Furthermore, after temporarily finishing your journey with this puncture strip, the safest practice is to visit a professional tire technician as soon as possible to have the tire taken off the rim and patched properly from the inside. Since there is a risk of these temporary plugs blowing out when driving long distances at high speeds, we remind you to always prioritize your safety.
And don't forget to always stay tuned with Motor Guide to learn more valuable information like this about modern vehicles and technology!

எழுதியவர்
Nisaga Sandaru
A versatile and highly experienced professional, currently an Automobile undergraduate at the University of Jaffna, with strong technical expertise grounded in hands-on work as a technician with SriLankan Airlines Ground Support Equipment (GSE). Holding an Automobile NVQ Level 3 qualification, along with specialized certifications in Vehicle ECU Programming and Diagnosis, and extensive experience in arc welding and vehicle body painting, and well equipped to handle complex automotive, diagnostic, and fabrication-related tasks with a high level of competence.